I have to admit, I was more than a little "over it" about halfway through, but I am SO GLAD I bucked up and did this. I love the way the room looks now.
Tonight, I embarked on another little project. I've been seriously bitten by the baking bug lately, and over the weekend all I could think about was pumpkin scones. For a couple of reasons, really - one, I love, LOVE all things pumpkin (see pumpkin centerpiece on kitchen table and vanilla pumpkin scented candle on bar, above), and two, I'm obsessed with the scones at Cafe Lutecia. I figured if I could learn to do scones the right way, I'd have REALLY accomplished something.
Well, you know, that and seeing this seasonal obsession on blogs everywhere.

I was so intimidated by the almighty scone that I really researched this bad boy. I cobbled together tips from all over the 'net, but generally followed this recipe, which claims to be a double for Starbucks pumpkin spice scone. I've never had one from Starbucks, so I can't speak to the truth of that, but MAN, these are good.

Cinnamon, ginger, clove and nutmeg.

Whisked together with the other dry ingredients (except for salt. I omitted the salt - not intentionally, I just forgot about it, and the scones don't seem to have suffered for it) and then cut in six tablespoons of COLD butter until just dry and crumbly.

In a separate bowl, I combined the pumpkin, an egg, and a couple tablespoons of half & half. True story - while doing this, I put the butter/dry mix in the freezer. I do not know whether this made any sort of difference, but I was paranoid about getting my little butter nubbins into the oven without melting first.
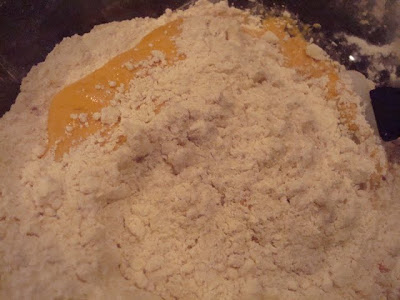
Take the dry out of the freezer. Fold the wet into the dry.

Knead juuuuuuuust a bit on a floured surface. Spread into a rectangle, cut into triangles. Leave the triangles together while you bake.

Mine needed about 17 minutes total at 425. Would have probably been closer to 14 or 15 minutes, but I accidentally closed the oven mitt in the door, so it was open a crack and let some heat escape.
While they were baking I mixed up the plain glaze. Recipe called for milk - I only had half & half, and I felt I needed to add about twice the amount called for to get the right consistency.

I also ended up using about half the glaze I made, which was plenty. I brushed it on with a pastry brush in two layers. One to melt beautifully all over, and one to thicken the coating a bit.


I used the leftover plain glaze as a base for the pumpkin spice icing drizzle. I just about doubled the spices called for in the recipe and mixed them into the plain glaze, together with a few more shakes of confectioner's sugar until I had the consistency I wanted.

The result?

OOOOOH. I like these.

Even with twice the spices, I didn't really taste a strong pumpkin pie flavor in the icing. I would probably add even more next time, or skip the plain glaze altogether.
I'm kind of in disbelief that I actually made scones. They aren't tough, they aren't dry, they aren't bland and floury. Holy crap. But really? Someone GINA said the other day -like, REALLY RECENTLY AND IT IS DRIVING ME CRAZY BECAUSE I CANNOT REMEMBER WHO (thank you e!) - "if you can read, you can cook." And, well, would you look at that.
Recipe:
Pumpkin Spice Scones, adapted from Food.com
Scones:
- 2 cups all-purpose flour
- 7 tablespoons sugar
- 1 tablespoon baking powder
- 1 teaspoon cinnamon
- 1 teaspoon nutmeg
- 1/2 teaspoon ground clove
- 1/2 teaspoon ground ginger
- 6 tablespoons COLD butter, cut into chunks
- 1/2 cup canned pumpkin
- 3 tablespoons half & half
- 1 egg
Whisk together dry ingredients.
Using a pastry cutter, two knives or food processor, cut in butter until dry and crumbly.
(If paranoid, put butter crumbles into freezer, bowl and all.)
Mix together pumpkin, egg, and half & half with a fork until blended.
(Remove paranoia bowl from freezer.)
Fold wet ingredients into dry until the dough just comes together. The mixture should stick together, but the wet/dry separation still evident.
Flip dough ball onto lightly-floured surface and knead lightly until dough resembles, well, dough.
Form dough into rectangle about one inch thick. Cut into three equal pieces, and cut each piece in half diagonally to form six triangles.
Leaving triangles touching one another, bake at 425 for 14-16 minutes. Cool on wire rack.
While cooling, make glaze.
Plain Glaze:
1/2 cup plus 1 teaspoon confectioner's sugar
2 tablespoons half & half
Add half & half gradually, and whisk together with fork until the texture is as you like it. Less half & half will give you a more spreadable icing; more will give you a brushable glaze. Use whichever method you prefer to coat the tops of your still-warm scones with plain glaze. While it sets, make pumpkin spice glaze.
Pumpkin Spice Glaze:
1/2 cup plus 1 tablespoon confectioner's sugar
1/4 teaspoon cinnamon
1/4 teaspoon nutmeg
1/8 teaspoon ginger
1/8 teaspoon clove
1 tablespoon plus 1 teaspoon half & half
Add half & half slowly and mix, as above. This glaze should be thicker, but still thin enough to drizzle. TASTE the icing as you make it - add a few extra shakes of each spice if you want a stronger flavor. Drizzle over scones.
Salivate. Enjoy.